Subscribe

RSS Feed (xml)

Powered By

Skin Design:
Free Blogger Skins

Powered by Blogger

Friday 26 February 2010

Bat Modelling - pt. 2 continued

I continued to refine each edge of the bat's wing flaps to enusre that a smooth fit was gained before doing anything else with the model.


For each section, I carefully moved the outer vertices to fill any gaps that were present when the wing flaps and the arms were aligned. This was a fairly straight-forward task which thankfully has not taken a great deal of time.


When the gaps were filled and any minor alignments fixed I can now add a symmetry modifier to the wing flaps to use on the other side of my bat. This was quite tricky - as the mirrored image was not aligned and needed careful x and y coordinate adjustments in order to fit the shape properly.


This has unfortunetly continued to cause some problems as some minor mis-alignments are still present. I will need to keep checking the model and fix these issues before the next step, which will be the 3d look.

Friday 19 February 2010

Bat Modelling - pt. 2

Now that half of the bat's body has been finished, it's time to use the symmetry modifer to mirror the model and create a full body layout..


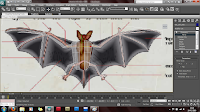
I noticed I has forgotten to give my bat a tail, so another plane was created with 8 horizontal sections and shaped into a tail that is now attached to the main body poly.


----------------------------------------------------------------------------------------------------
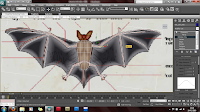
The next step on my bat model is to now craft the 'membrane' wing flaps that are positioned between the bat's arm structure. I will be continuing to use the 'plane-modelling' technique to great use here , including the soft selection tool to shape the vertices as desired.

I started off with a plane, using a 12x12 cross-section setting..


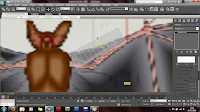
Next I converted the plane to an 'editable-poly' and begun to mold the plane's shape to fit the wing section located near the bat's shoulder..


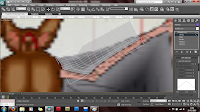
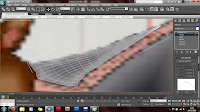
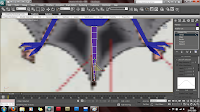
I arranged the vertices to flow in a neat pattern that will hoprfully render nicely with some lighting effects. I tried my best here to mimic the shading from the reference image in regards to positioning / flowing the vertices in each section.

This process was continued for each section of the bat's wing. The larger areas were more difficult to craft properly and arrange the vertices in a neat fashion, however as time-consuming as this was, this is still a very simple procedure you just have to be extremely patient!


The 'soft-selection' tool came in very useful here to start with, each corner was first positioned on the bat's wing section as see in the image above. After some tampering with the vertex positions, the soft-selection tool soon became more of a nuisance to perfecting the shape, so i opted for the regular 'individual' vertex editor to fine tune the plane and fit the section correctly. I am very pleased with the result so far, the images clearly show how the vertices flow in regards to the shading on the background image.


After each section of the bat wing was finished, i then combined the new wing pieces with the bat's body for further fine-tuning and corrections..


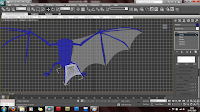
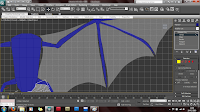
I have purposly left a gap between each section of the bat. This is due to the fact that expanding the plane to create a 3D body with the limbs attached will result in a flat model. So instead each section will be made 3-dimensional and attached seperately resulting in a more realistic and visually correct model.

I take great pride in fine-tuning each section carefully, if needed, one vertex at a time to get a very neat and easily manageable model. So far, around 5-8hrs has been spent perfecting the bat's body and wings which I hope to have completed very soon!

Tuesday 16 February 2010

Research & Inspiration

Here i will be detailing my design ideas and what things have given me inspiration towards my animation and its features.


#Intro Scene
For my intro scene I wanted the camera to pan down through the trees of the forest, passing objects along the way (maybe even an owl sitting on a branch). So I thought about how this could be done and how it would look and chose to base my idea on a piece from one of my favourite PC Games - Dawn of War 2.

Dawn of War II trailer

The Game trailer begins with the camera pan down effect im looking for and it helps alot to see how this looks when used. (There is also a forest-environment present! - perfect)

This effect can be seen at: 0:04 - 0:14 secs in the movie


#Character theme / Design
The Characters featuring in my animation need to be simple yet but effective in the way they portray feelings, thoughts and interaction with one another. I'm a big fan of the wallace and gromit model designs and thought this would be absolutely perfect for a children's animation.

The models show a large about of thought and emotion in their faces, mainly the use of the eyebrow line and mouth.


Monday 15 February 2010

Bat Modelling - pt. 1

My first character in the fable is a bat, so this will be the model i will start with.


I started off by researching some good images of a bat to craft with and found a suitable 'morphology' view of a bat that I have chosen to base my model on. this is a particularly good reference image as it shows all body parts and how the wings work. To begin, I created a simple plane with dimentions matching that of the reference image and applied the image as a material using the material editor and assigning a bitmap image.


I have become quite proficient and comfortable starting off with 'planes' to model my pieces, therefore I will be using the same technique here for the bat. The image demonstartes the first stage of the 'plane-modelling', where the body is covered with a plane that has been set as 'see-through' under the object properties settings. This allows me to carefully edit and mold the plane to get the desired shape to work with.


I covered half of the bat's body with the plane, then applied a symmetry modifier to get the exact same shape on the other side - as the image shows, this allows a nice, neat finished plane covering the bat's body.

After the plane has been shaped to fit the bat's body, I continued to expand the plane by selecting relevant edges and cloning the selection, to create a new section which covers the next area. As you can see in the image above, the plane has been extended and shaped to cover one of the bats arms.


Once the entire arm of the bat was finished using the edge / clone expansion technique. I did the exact same for the bat's lower leg and feet. The next stage of this modelling process will be to clean up any edges that are not aligned or shaped properly and finally add another symmetry modifier to mirror the plane on the other side to save time and get a good, simple base-outline to work with.

Story Boards

So The fable I have decided to choose is: "The Bat, the Birds and the Beasts"..

I've created a simple storyboard to start planning how my animation will look, what characters are involved and how each scene is tied together, along with what is happening in the animation:


At the present - I think these designs are not detailed enough to show the final ideas and concept behind the story of this fable. The simplicity of these inital designs however shows what the fable is about and who is involved (i.e. characters) and some interaction. I will need to create another version of my storyboard to get the desired information down on paper and work from there!

Friday 5 February 2010