Subscribe

RSS Feed (xml)

Powered By

Skin Design:
Free Blogger Skins

Powered by Blogger

Friday, 16 April 2010

Modelling a Human Head pt.2

Modelling the Face & Nose

Next came modelling the structure of the face - once the eye socket and the mouth were completed, it was just a case of 'filling' the gaps.

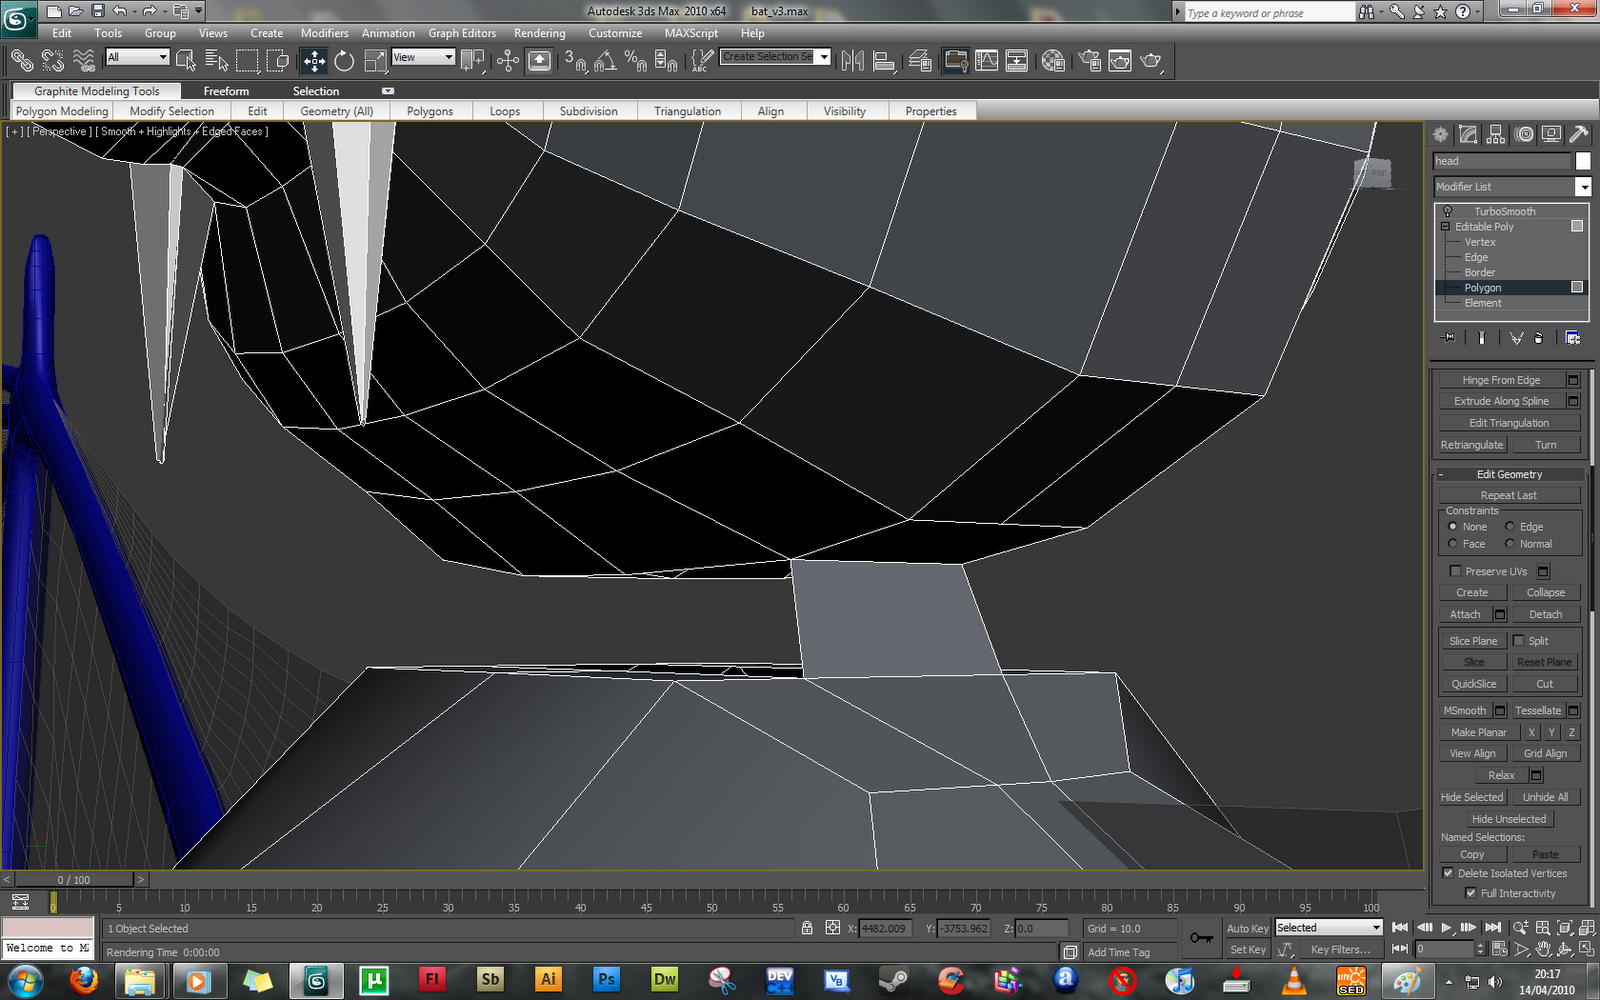
To begind, the bridge of the nose was created by copying the polgons on the inside edges of the eye socket. Once the top was created - the edges were extruded down the nose using the 'extrude tool' to get an even distance between edges.


To create the cheeks - I used the 'create polygon' tool which allowed me to cover larger areas with a polygon effectively. This process was continued to cover the majority of the face.

The images above show the face completely covered with polygons, with no gaps. To further increase the cleanliness of the polygons and allow easier work when the time comes to cover the rest of the head, the 'cut' tool was used to create edges for a more equal layout.
The final section of the face to do was the Nose. This was created while the bridge of the nose was modelling, carefully using the right viewport in order get the desired extruding length away from the face. Through using the cut tool to tidy up the polygons surrounding the base of the nose, i was able to effectively create nostrils to quite a high detail - however no more needs to be done here due to the level of detail I am aiming to produce.

Modelling a Human Head

I will need a suitable head to attach to my human character, to do this I have found a very simple and quick modelling tutorial to make a human head..

http://www.secondpicture.com/tutorials/3d/3d_modeling_of_a_human_head_3ds_max_01.html


I will be modifying this tutorial for my own use and character design as my character will not look exactly like this.


This tutorial provides an excellent pair of reference images that are carefully used during the tutorial in the front and right view.

The Mouth

To begin, I created two planes to display the images as materials..


Next, I crafted the mouth by creating a small plane in the front viewport, adjusting the vertices also in the right viewport for the 3d structure


To create the mouth, the plane was converted to an editable polygon and one edge was extended repeatedly and positioned around the mouth line.

Whenever a new polygon was created, the vertices were modified to reflect a front and right view. This is important for shaping the model correctly.

Once half of the mouth was created I used a symmetry modifer to mirror the opposite side. This saves a huge amount of time and will be used on the entire model, it also provides an effective model shape on either side.

The Eyes

To create the eyes, a polygon was copied from the mouth section and positioned uderneath the eyesocket..


The same technique of extending a creating new polygons from the edge of the original polygon was used here to encircle the eye. (note the symmetry modifier creates the opposite eye socket)

You can see here how the right view is used to create the ridge of the nose between the eyes as the eye socket polygons are extended to cover this.

*note - I will not be focusing too much on the detail of the eye sockets as I am planning to use sunglasses on my character.


Thursday, 15 April 2010

Attaching the Arms

The next step to completeing my bat model would be to attach the arms and legs to the body. This was a fairly tedious process as it was very easy to make a mistake and cause problems with vertices' locations.


To begin, the section of the arm that will be connected to the body was made larger using the scale tool and cleaning up by removing unwanted edges to get a more simple area to connect to.


This process was repeated for each arm and leg - in preparation to be connected to the body. When joining the body parts, the 'weld' tool quickly proved to be the most useful in getting the connections correct.
In some areas, extra edges were needed on the body section in order to provide the correct number of vertices to join with the limbs.
Overall this didn't take a tremedous about of time but in future, i will definetly avoid modelling this way to prevent the chance of errors and having to join sections together in quite a delicate manner.


Bat Head Modelling continued..

With the overall look of thebat's head finished including some of its more distinctive features I applied a 'turbosmooth' modifier to see what the model looks like with a smoothing effect..


So far I am quite pleased with the result - the ears and facial structure need more work but this is a good start for the bat.


The next step was adding the head to the rest of the bat's body. This proved difficult in some areas around the next and upper body, especially the sides / shoulders. To attach the head, I removed the polygons covering the top of the bat's body and those on the underneath of the bat's head.


I then used the 'bridge' tool to connect the edges between the head and body, effectively creating a neck.


Again this section created multiple issues with polygon arrangement and position. I needed to spend a large amount of time correcting and cleaning up the model before going any further. I did this by using the cut tool to create new polygons and remove those causing problems essentially reducing the amount of polygons used here.


To finish attaching the head to the bat's body - I cleaned up only half of the bat's neck to save time, using the symmetry modifier to have a symmetrical shape on both sides of the bat.


After this I started looking at how the bat's facial expression would be reflected using his eyebrow line..


This again needs more time invested but you can see how i will be using this to influence his facial expression and visual emotions.

Monday, 5 April 2010

Modelling the Bat's Head

I started to model the bat's head using this reference image:


I want my characters to have a 'Wallace & Gromit' theme so basing my bat's features on the were-rabbit seemed to fit suitably. Using planes I carefully modelled the outline of the face..


Modelling only half of the head allows me to use the symmetry modifier to get a perfect outline on either side of the face. Note the head is currently at an angle, this was simply to re-create a face from the ref image.

Next the nose was created using the same 'planes' technique..


With the nose and head outlines finished - I can now give each section it's 3D shape..


I did this using the extrude tool and altering the settings carefully to get the result you can see in the screenshots above. The back of the head was smoothed off by adding more polygons using the extrude tool.

To follow this, both sections were 'attached' to become one editable polygon. this was done to ensure the vertices on the ends of both shapes could be connected properly without error or messy mesh results when a smooth modifier is applied.


The weld tool was used to connect each verticie - this took slightly longer than expected as some lines and verticies needed to be reshaped or removed to get a good result..

Friday, 26 March 2010

Human Modelling - Clothing

My character's role in the animation is a 'wildlife-Photographer' therefore relevant clothing and details are needed to ensure his image reflects his role..


A shirt with a white t-shirt underneath is fine - with shorts or three-quater lengths for the legs and boots to finish.

Human Modelling pt. 2

Continuing to develop my human character for the animation, I used the same methods as before to extrude / extend the leg upwards to model the knee and thigh..


To check the shape of the leg - I applied a symmetry modifier and aligned this to the reference image, So far I am impressed with the results..


*before continuing - it was important to take the time here to reshape the leg and brush up on any areas that were abit sloppy, leaving a good clean mesh to work with later.


Waist / Hips

With the legs completed, the hips and groin were modelled.. again simply by selecting the polygons at the top of the model and using the extrude tool with a setting of 5-10.


*Whenever using a symmetry modifier - making sure the inside surface (polygon / edges) are all flat saves a tremendous amount of time correctly errors when aligning the shapes.

With a basic shape for the waist done.. corrections and some remodelling was done to refine the model's overall shape..


Chest

To create the middle and upper body - the top polygons on the waist section were flattened, extended with the extrude tool and carefully modelled in relation to the ref. image I was using..


This section was fairly straightforward and required little readjustments in order to get the desired shape. The difficult part was the side view of the model.. making sure the chest features were shaped correctly.


Arms

The arm required slightly more crafting in order to define certain features such as the upper and lower arm muslces and the elbow section. Just taking the time to carefully extrude bit by bit, I was able to produce a relatively simple arm shape which is versatile when it comes to shape adjustments.


I am very happy with how this has turned out so far - this is the first time I have used the extrude tool to a large extent to create a large model like this!