 RSS Feed (xml)

Using planes to being a model really makes this process easy, the difficult part to expanding flat surfaces is getting the desired width and shape for the final model, this is especially time-consuming when circular area's are involved such as the bat's body.
I continued this process by expanding the bat's tail, again simply pulling the vertices outwards, followed by the bat's legs..


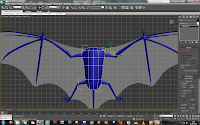
The final area to expand is the bat's arms, I did this by selecting only the middle vertices along each arm / finger and pullingthe vertices down. I also added some additional edges here for a better result along the 'hand' section of the bat's arms.


----------------------------------------------------------------------------------------------
And the Final result so far....
-------------------------------------------------------------------------------------------------
To complete the 3d model, I used the 'border' tool to select the inner edge of the bat's body, then using the scale tool, made sure the edges were aligned correctly and flat. I did this because when it comes to using the symmetry tool, for best results you must ensure the mirrored edge is 100% flat to avoid and cuts or breaks between the mirror image and the original.


Before the symmetry tool was used however, I extruded the border edge using the extrude tool with a setting of 5.


I repeated this process for the bat's arms - I did this seperately to align the wings mid-way on the bat's body..


No comments:
Post a Comment