Subscribe

RSS Feed (xml)

Powered By

Skin Design:
Free Blogger Skins

Powered by Blogger

Friday 7 May 2010

SWOT Analysis

Strengths:

In this module I have found one of my most notable strengths is patience and the willingness to spend time experimenting with different features of the program such as using cameras, Biped mechanisms and weighting models for animation.

I feel I have gained a good understanding of how Bipeds and skinning is used to animate models as well as how different lighting can be used to influence the mood and appearance of a scene.

Weaknesses:

One of the biggest weaknesses that have shown up while undertaking this work is the relationship between complexity and available time for development. I take pride in designing higher quality models and have such suffered on animation time due to the amount of work put into the models being used in the animation.

I have learnt that very careful planning can determine whether the initial idea can be made to standard within the given time limit, I will in future be taking the development time period into account when it comes to designing any piece of animation work, so as to avoid this issue.

Opportunites:

Last year I touched on Bipeds and lighting techniques briefly, along with the use of cameras. These have played a major part in the animating side of 3DS Max and have proven to be some of the most useful tools to be used.

I have been able to practice weighting techniques considerably during this course and can safely say that I am comfortable using this feature on any future work.

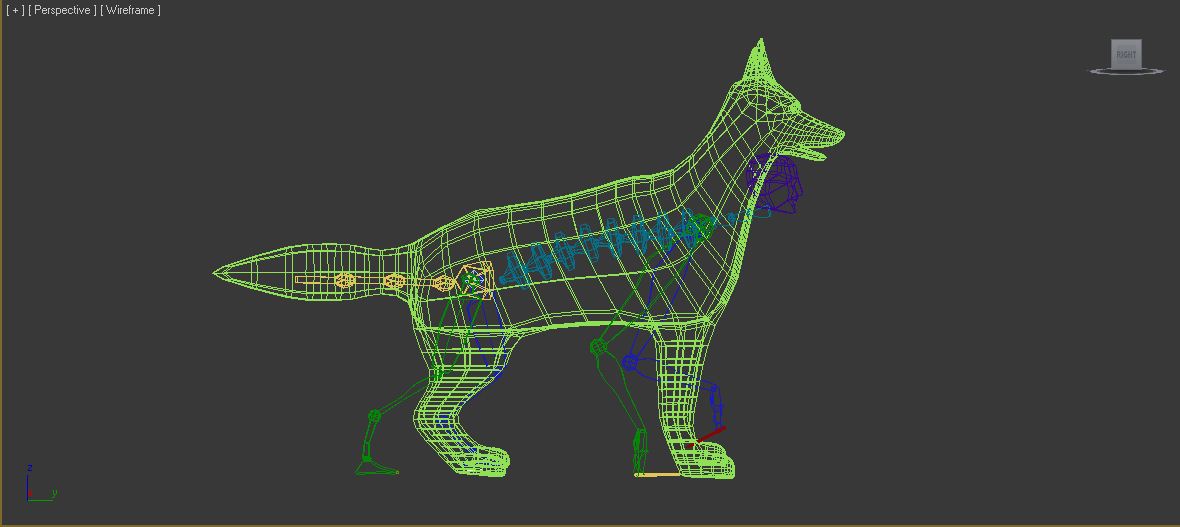
Finally, having the chance to use Bipeds properly has given me a good insight into Animation within 3D Max. I have learnt more about how skeletons work and what types of movement affect different areas of the body.

Threats:

The biggest issue I have experienced during this course is to do with the biped and skin link on my models. I found that when a skin is applied to a biped that has already been animated it tends to lose its 'connection' when the file is saved and reopened. This unfortunetly caused me to waste time trying to recover from pieces of work that were lost when the skin / biped link was removed.

Better devtime management is still an important area that needs to be taken into consideration when any future work is undertaken.

Thursday 6 May 2010

Animation - Final Scene 5 - Bat + Fox + Bird

For my final scene I have kept the amount of animation down to allow the narrator to explain the scene more.


Again, using the camera angles I have been able to easily transfer the views watching different characters while the Narrator is talking in the background. This scene ends with the morale of the story followed by a short series of credits.


Animation - Scene 4 - Bird + Fox + Human

For my fourth scene - I saved time by linking a majority of the smaller scenes / events i wanted to add to my animation all into one file.

This scene features a change of time (from night to day), along with simple yet effective camera angles. I was able to reuse the walk sequence for the fox as it suited the event of the bird and fox meeting.

One event i wanted to add to this scene in order to add some humour for its target audience (children), was the introduction of a photographer. This character would stop the collision between the animals by photographing them - obviously drawing their attention away from fighting.


One area of this scene I feel did not go to plan was the way the character is holding the camera, as you can see in the screenshot - his hands are not entirely wrapped around the sides of the camera, leaving untidy gaps.

However, I do feel this scene is effective in producing a humourous and interesting piece to watch as part of my animation. the result can be seen below:

Animation - Scene 3 - Bat + Bird

This scene was not as difficult to produce compared to the previous scene featuring the fox. Here i have tried to keep the animation down to a minimal and relied on camera angles to get the effect i was looking for.


Unfortunetly I feel the Bird needed to be animated more in this scene in order to get a more realistic looking series of events. Seeing as a biped was not used on the bird, I was limited to the range of movement I could add to the bird - Too much animation of the polygons would cause the program to crash!

However I was able to split the animation up into small clips and mold them together - producing a fairly clean wing flapping animation by simply manipulating the polygons creating the wings.


Sunday 2 May 2010

Animation - Scene 2 - Bat + Fox

This is where the animating starts to step up considerably. For this scene I needed to animate a walk sequence for my fox which unfortunetly proved to be quite a difficult and lengthy task.


One of the biggest issues with this particular piece of work was the fact the biped movement was more or less trial and error. After positioning the legs ready for the next movement, using the 'planted key' on the next frame would sometimes throw the limb completely out of position and required me to try slightly different positions on previous frames to get each section working.

After a lengthy period of trial and error with the biped I finally managed to produce a working version that is suitable for this scene and can even be used again!

The Bat fortunetly required very little animation and only appears in this scene for brief periods.


Saturday 1 May 2010

Animation - Scene 1 - Intro

I had a good idea of how I wanted my animation to look like and a rough ideas of what camera angles would give the best effect.

Looking at the game trailer video i talked about in my inital ideas - I setup a scene containing varies trees, a simple landscape and obviously - all the models I would be animating. From here I experimented with using the camera and how I could be animated to move down the top of one of the trees (as seen in the game trailer.)


This was very easy - especially as the camera in travelling in a straight line! I set a starting keyframe at 0 and positioned the camera how I wanted it to end further along the timeline. This took a few attempts in order to get the desired length of scroll motion correct, however I am very pleased with the result!


Thursday 29 April 2010

Human Biped & Weighting

Fortunetly my human character requires minimal movement of the body, instead just the arms will contain the majority of the movement. This was a very simple addition of the Biped as the default stance resembles a human skeleton and posture to beging with.


Weighting

The Weighting for the human model was quite straight forward. Again I will not be doing large amounts of movement or any complex postures, positions, actions etc. The main areas I focused on was making sure the arm movements were smooth along with relevant weighting on the leg joints - especially around the pelvis.

Otherwise I am pleased with how the weighting went for this model, keeping it quite simple has definetly provided me with a suitable model that can easily move as needed for the featured scene.

Bat Biped & Weighting

The bat will also have animated scenes, therefore Biped and weighting is essential.


The bat is by far the most difficult biped to model - positioning the arms and finger along the wings took a fair bit of time getting use to how the arm structure rotates and allows movement. Eventually aligning the biped within the model was easy with appropriate adjustments.


Weighting

To ensure any movement of the wings or head didnt stretch or pull areas of the model that were not necessary I needed to weight the skin properly to the biped using the skin modifier and weight tool.

So far the Bat model will not need to be animated extensively - meaning only average amounts of weighting will need to be configured, mostly areas affecting the wing section and the head / neck.

This took some time getting used to how the arms moved with this particular biped as adjustments were needed to be made throughout the weighting process to order to produce a fairly clean skin.

Tuesday 27 April 2010

Fox Biped and Weighting

In order to animate my Fox - I will need to add a biped the to the model, along with suiatble weighting of the joints to get a realistic movement effect.

I started off by creating a new biped through.. Create > Systems > Biped. Then rotating the skeleton to a horizontal position. Next using "Figure Mode" in the motion rollout, I positioned the arms and legs to fit inside the model.
*Hot Tip - freezing the model prevents accidental movement when attempting to align the Biped and prevent the model from being selected.
This is a fairly simple process and can be done in a short space of time if done correctly.


Weighting

The fox model required fairly extensive weighting to simulate clean movement of the joints. What makes this type of model particularly difficult to skin properly is the fact that mistakes can easily be seen through small movements and the structure of the skeleton affects a large number of smaller section of each leg.

Testing consistently after small sections were weighted was the best approach to this task - eventually I was able to weight the model to a standard that allows the model to look very realistic with the right use of lighting.

The fact that I needed to keep going back over the skinning process to correct errors has allowed me to become quite proficient using the weight tool and blending the vertices.

Monday 26 April 2010

Fox Texturing

I used a UVW map to add a texture to my fox.


This by far one of the trickiest parts of modelling - I attempted this last year with other models and found it very difficult to prevent cracks appearing in the texture. Fortunetly the outcome of this model's texture wasnt too bad, with minimal cracks, hopefully cannot be seen in the animation!

Fox Modelling part 2.

To continue with the modelling of my fox I will now be creating the body.

Using a previous techinique, I created the body shape using a plane and extruding the edges. Next the plane was converted into an editable poly, to give it it's bulk using the extrude tool.


A symmetry modifier was then applied to the model and the body aligned correctly with the head. Now comes the attachment to the head, I was extremely surprised with how easy this was to do using the bridge tool after selecting the polygons at the back of the head and the top of the body. looking back now this would have saved time on my human model by using this technique to attach the head. (lesson learnt!)
Finished Model.

Saturday 24 April 2010

Fox Modelling part 1.

The last character in my animation will be a fox - This will require a biped added at a later date to simulate a walk sequence.


To begin - I created a sphere in the left viewport with a setting of 8 segments, this will be used as a base to model the head from. Next the sphere was converted into an editable polygon - this allows us to further model the shape of the head to suit our needs. To create the 'nosel' for my fox, I used the 'bevel tool' on the front two polygons, carefully adjusting the settings to get the desired shape as appropriate. The mouth was modelled by using the cut tool to create an additional edge to which we can extrude from to make the bottom jaw.


The next part was create some ears for my fox - I will only be creating one ear as a symmetry modifier will be applied to the head when the features are finished. To do this I used the 'inset' tool and selected one of the top polygons to create the ear from, by dragging the polygon to from two shapes, a square and a triangle. These were then extruded from the base of the head to form the ear.


The eye was created using the same method - except the extrusion was into the head not away from it! A symmetry modifier was then applied when half the polygons were deleted to get a clean head design for the model as the can see in the image above. Amd the end result..

Tuesday 20 April 2010

Human Modelling - Final

To give my model its unique look - I made some alterations to the nose and gave my model sunglasses and hair:


The nose was extended further from the face in an attempt to add the wallace and gromit theme along with simple hair created by yet again extruding the polygons and slitghly reshaping them.

The most challenging part was create the sunglasses - which was done by carefully copying a polygon away from the eye socket and extruding the edges to stretch around the face.

Finalling, the head was attached to the body of my body by scaling the head size down to match the body, then using the polygon create tool to create a new neck:


Modelling the Hands

After finding a great reference image online - I create a plane on the image and extruded the edges to cover the shape of the hand; the same technique used previously. I then added a slight curve to the outside of each finger and added a symmetry modifier to complete the hand.
This was then attached to the wrists of the arms using the weld tool on each vertex.